🤑 Discover Proven Side Hustles You Can Start Today — No Experience Needed. 👨🎓 Learn More Here....
Systeme.io Tutorial - A Comprehensive Guide For Beginners to Master Your Online Business
Systeme.io is a comprehensive marketing platform designed to help you manage various aspects of your online business effectively.
By signing up on their website, you can choose a plan tailored to your needs.
After creating your account, you will have access to tools for building sales funnels, setting up email campaigns, and even launching an affiliate program.
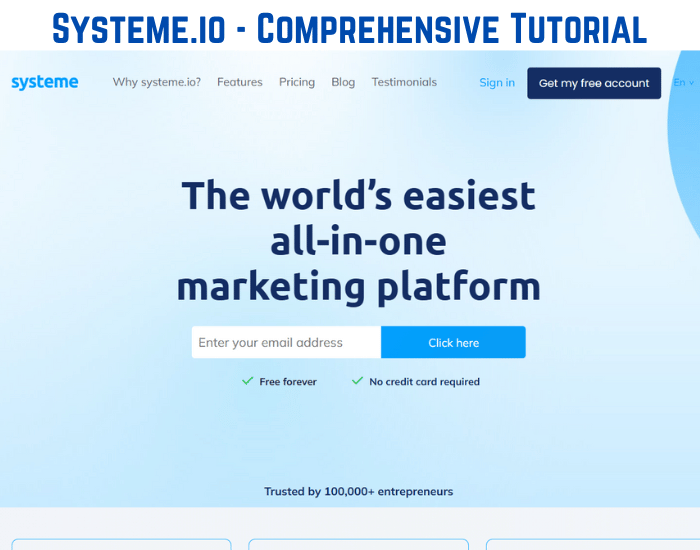
If Your Prefer to learn by Videos - You Can access a complete free collection here.
This platform simplifies your business operations and reduces the necessity of juggling multiple tools, which can save you both time and money.
With a user-friendly interface, even those without technical expertise can navigate its features with ease.
This article will guide you through the essentials of usingSysteme.io, from account setup to leveraging its various functionalities for successful online business management.
Key Takeaways
You can create aSysteme.ioaccount and choose a plan that suits your needs.
Setting up sales funnels and managing contacts is straightforward withSysteme.io.
The platform also offers additional features like course creation and affiliate programs.
Part 1: Create YourSysteme.io Account
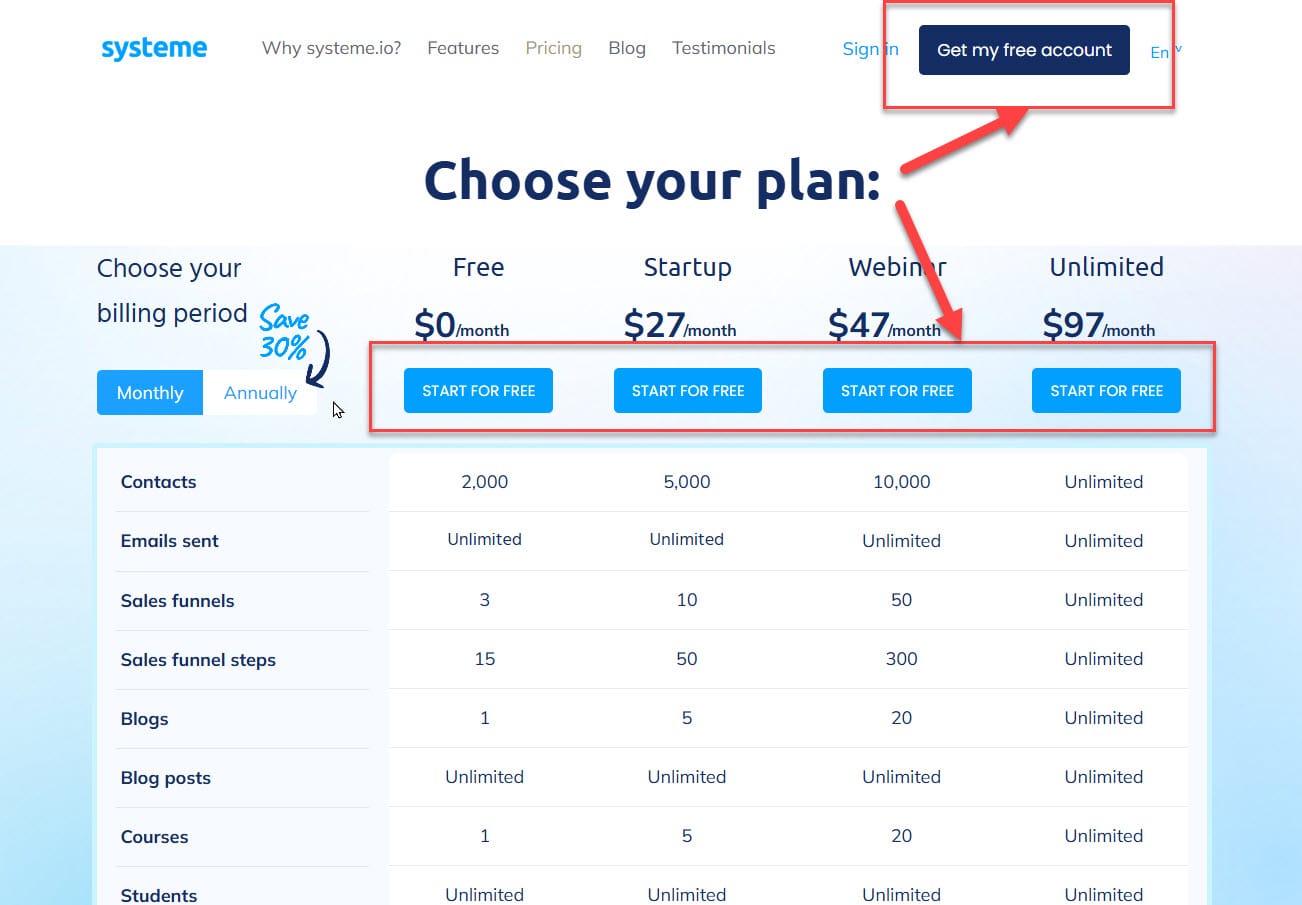
Systeme.ioprovides a variety of plans to choose from, including a free option and three paid plans:
Startup, Webinar, and Unlimited.
Each plan includes different features, so review them to find the one that matches your business needs and budget.
It’s a good idea to test out the free plan first to see if it meets your expectations and to determine if you may want to upgrade later.
1.3. Create Your Account
If Your Prefer to learn by Videos - You Can access a complete free collection here.
To sign up, click the "Start for Free" or "Get my free account" button on the home page.
You will need to enter your email address, which will be used to establish your account.
1.4. Verify Your Email
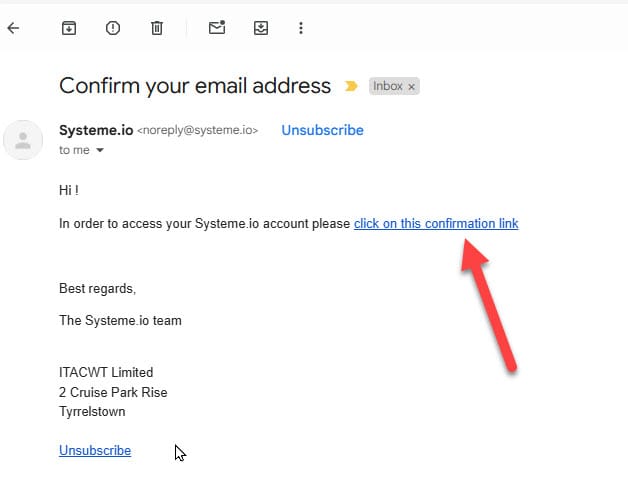
After registering, check your email inbox for a message fromSysteme.io.
This email will contain a confirmation link.
Click the link to verify your email address, which will allow you access to your new account.
1.5. Navigating theSysteme.io Dashboard
TheSysteme.io control panel serves as your main hub for managing all aspects of your online business. It includes many tools such as the sales funnel creator, email marketing manager, course building features, and affiliate program options.
Please watch the video below:
Dashboard Walkthrough
Or View Here on YouTube: https://youtu.be/1BBk42NBHCo
Part 2: Setting up aSysteme.ioAccount
2.1. Fill Out Your Profile Information
Once logged in, go to the "Profile" section found under "Settings." Here, you can provide necessary details about your business, update contact information, and set your timezone preferences to get started on the right foot.
Before you proceed, consider reviewing the officialSysteme.io tutorial for helpful guidance as you navigate the platform.
Please watch the Video Below
Settings Walkthrough
You'll find that getting around the control panel is straightforward.
The sidebar menu provides direct links to key areas like Dashboard, Funnels, Emails, Contacts, Products, Affiliates, and Automation.
Simply click on any of these sections to access and manage the features you need.
2.2. Linking Your Custom Domain
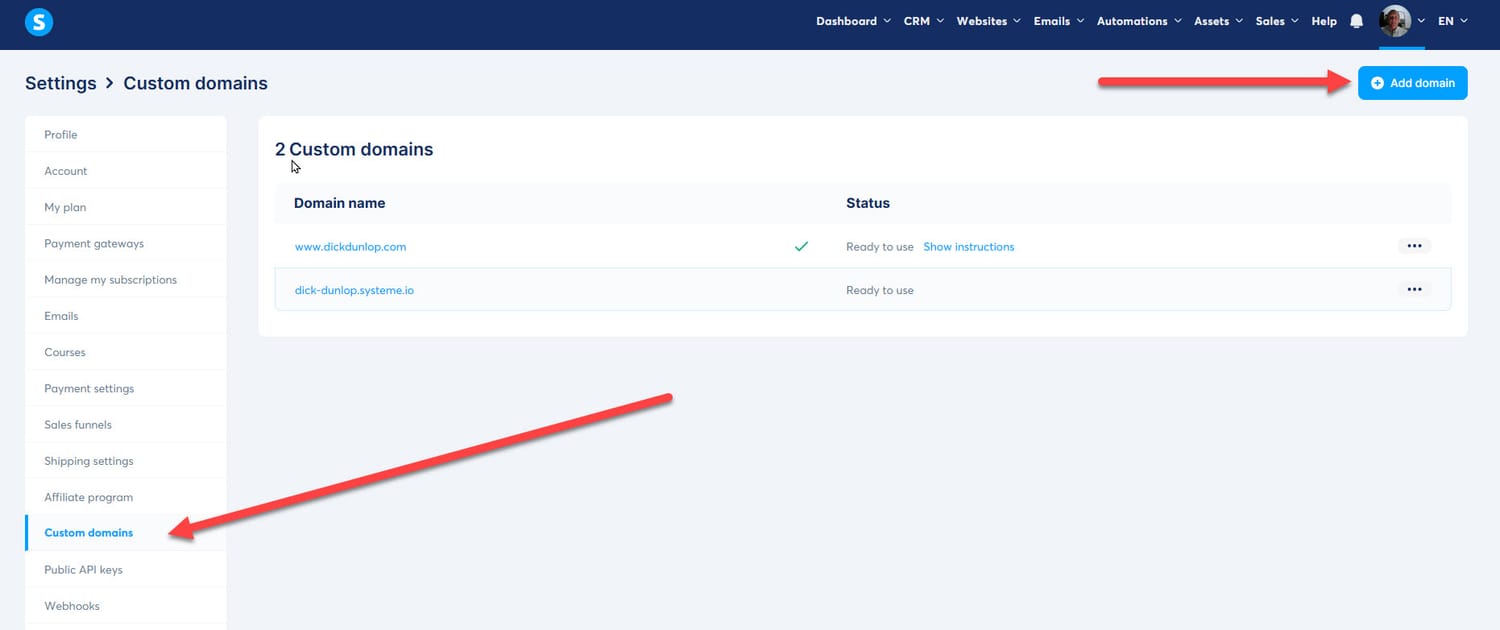
If you want to use a custom domain, head to the Custom domains section found in Settings to connect it to yourSysteme.io account.
Click on the Add domain button. In the next window, input your domain name (remember to include www).
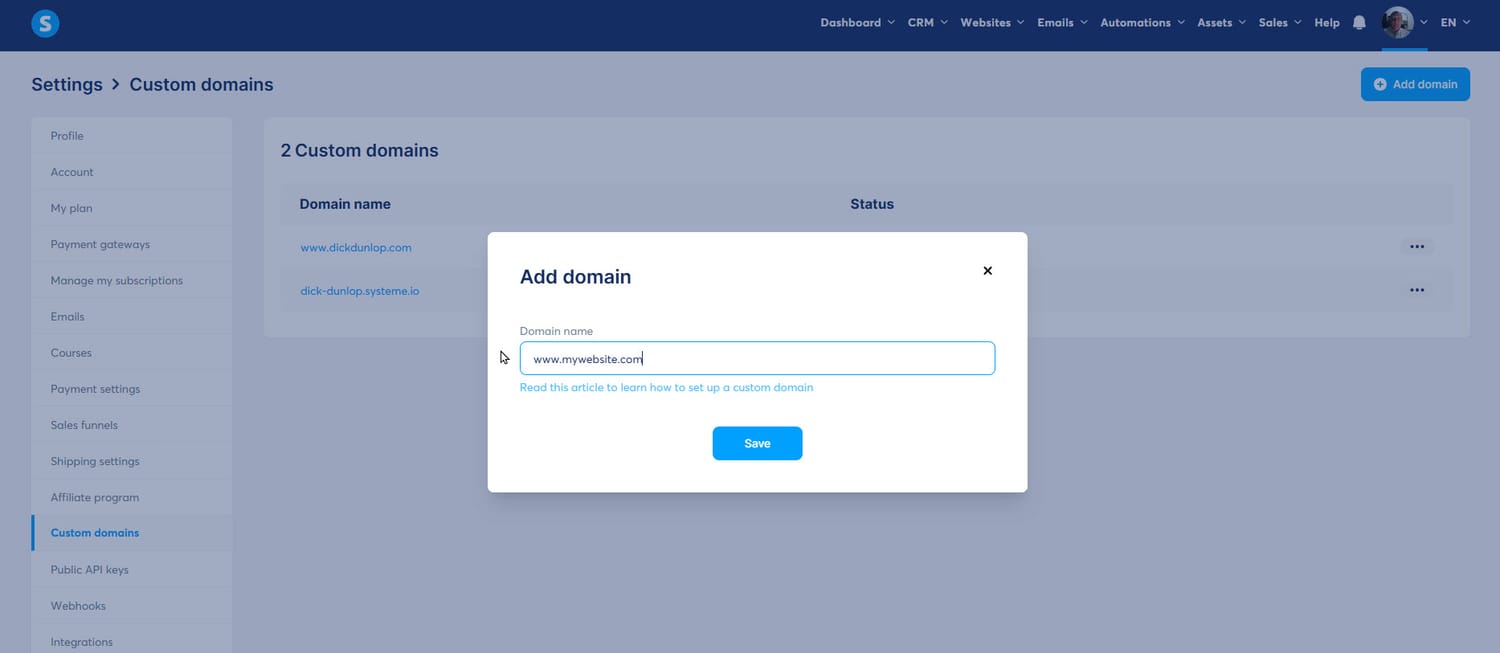
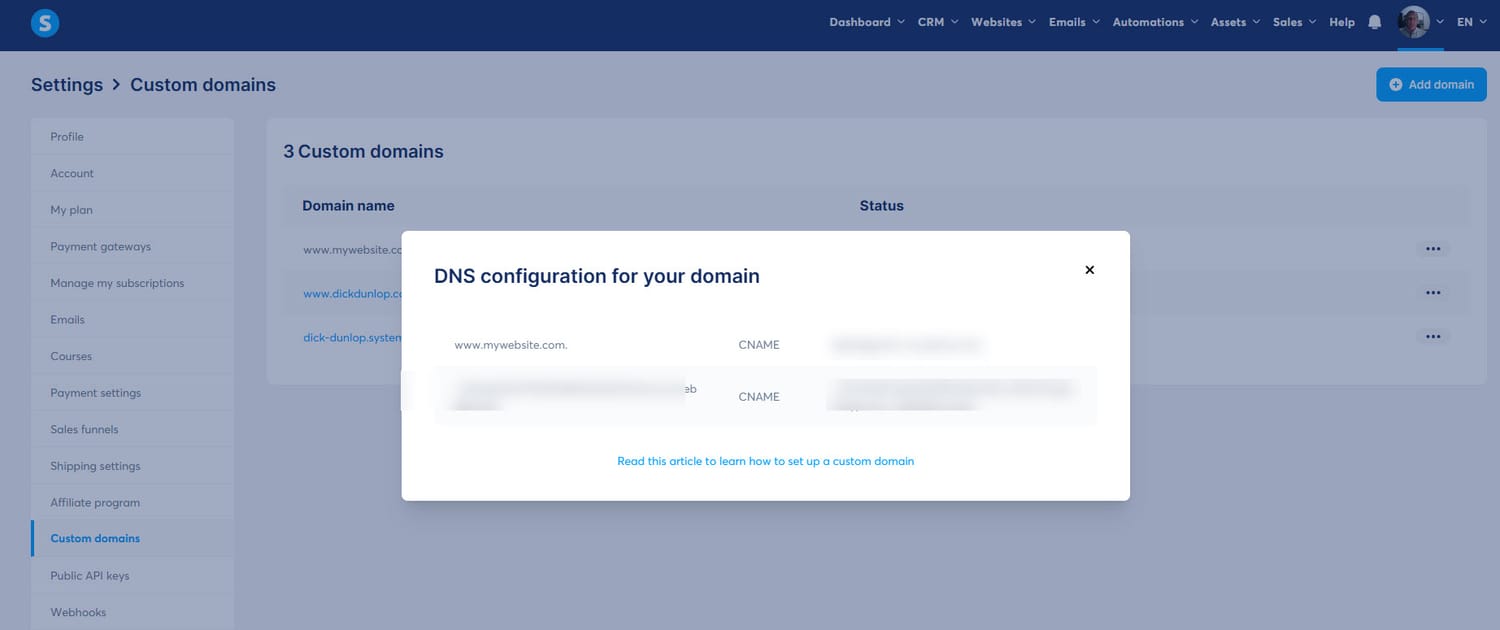
After that, a new window will appear displaying your DNS records.
You will need to provide these records to your domain registrar.
If you need assistance, there is a clickable link in the popup that leads to a detailed guide on how to complete this process step-by-step.
2.3. Connecting Your Payment Processor
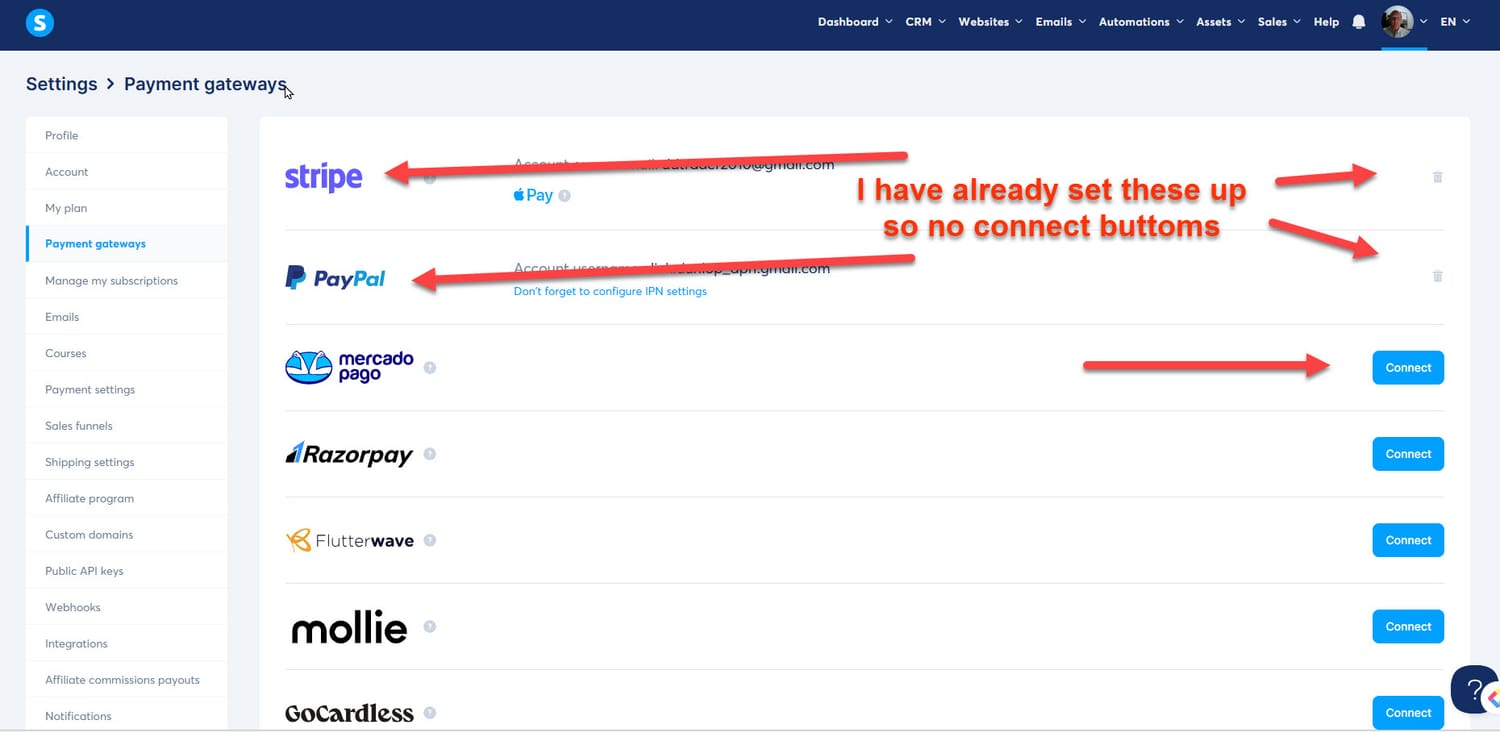
To enable secure transaction processing, connect your chosen payment processor, like Stripe or PayPal.
Navigate to the Settings section, then select Payment gateways.
Choose the payment processor you wish to link, click the Connect button, and follow the provided steps.
To verify proper integration, consider creating a test item inSysteme.io and attempt a test purchase.
If the transaction goes through successfully, your payment gateway setup is complete.
Part 3: Building Your Sales Funnel
3.1. Set Your Funnel Objectives
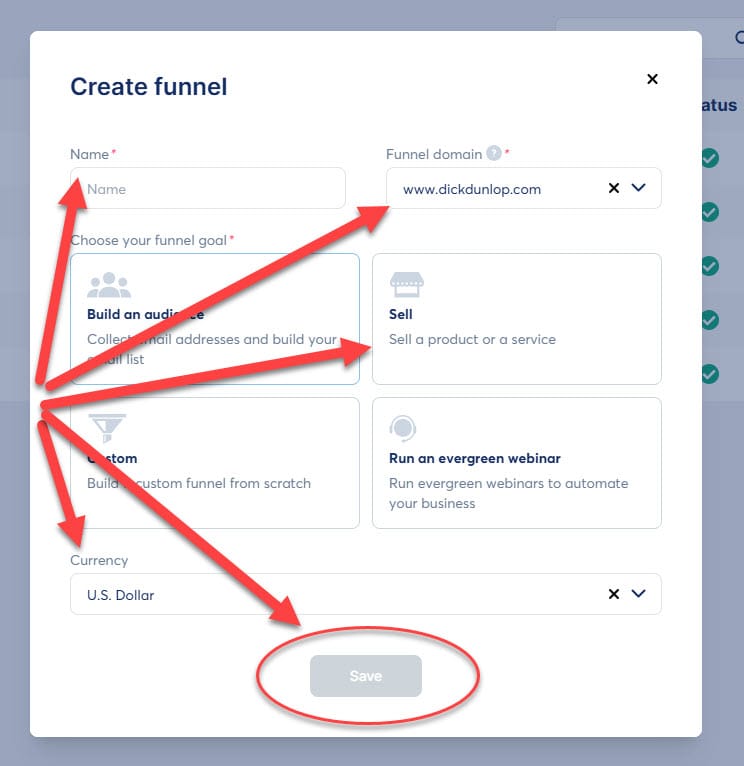
Navigate to the “Funnels” tab and click on “Create.”

In the dialog box that appears, input your funnel name, select the domain for your funnel, decide on your funnel's objective, and specify your preferred currency.
Once you have filled in this information, click the “Save” button to proceed.
3.2. Select a Funnel Template
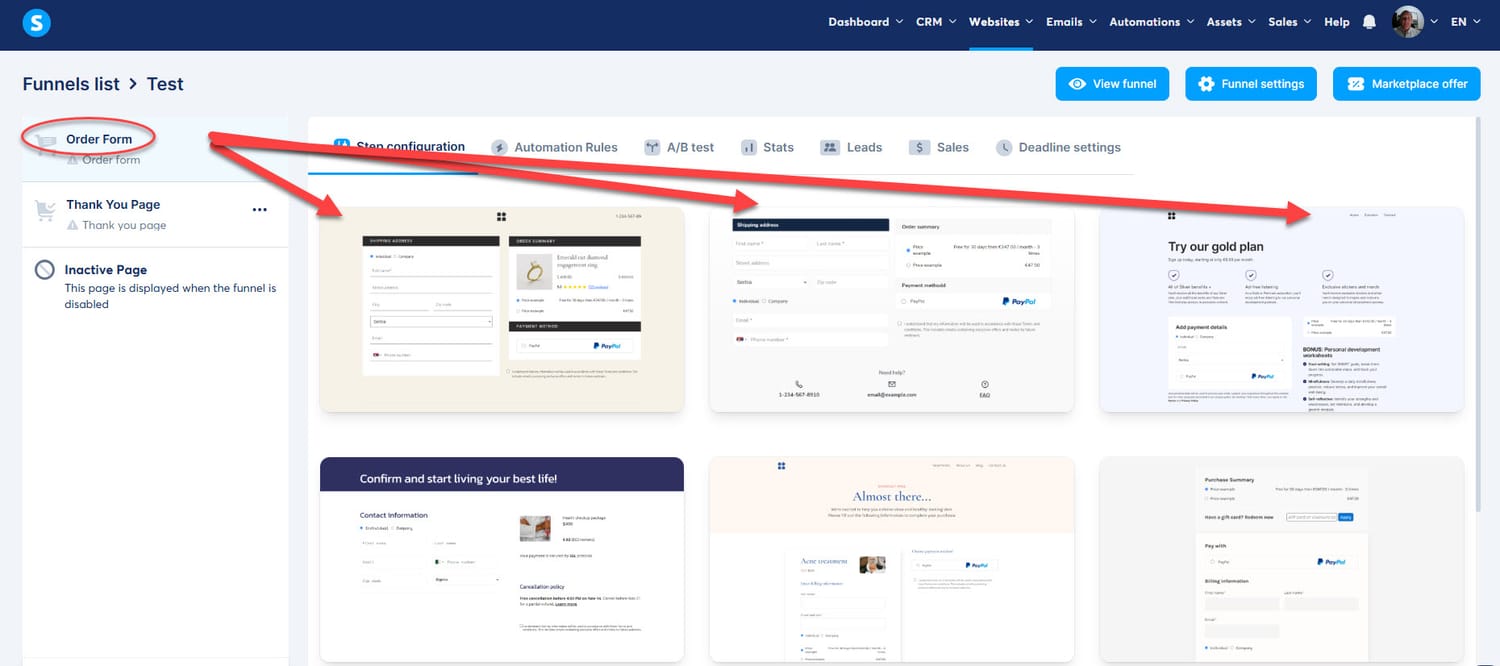
See Systeme.io templates here, they offer a variety of ready-made funnel templates designed for different purposes.
Choose a template that best fits your specific goals to streamline your process.
3.3. Adjust Your Funnel Steps
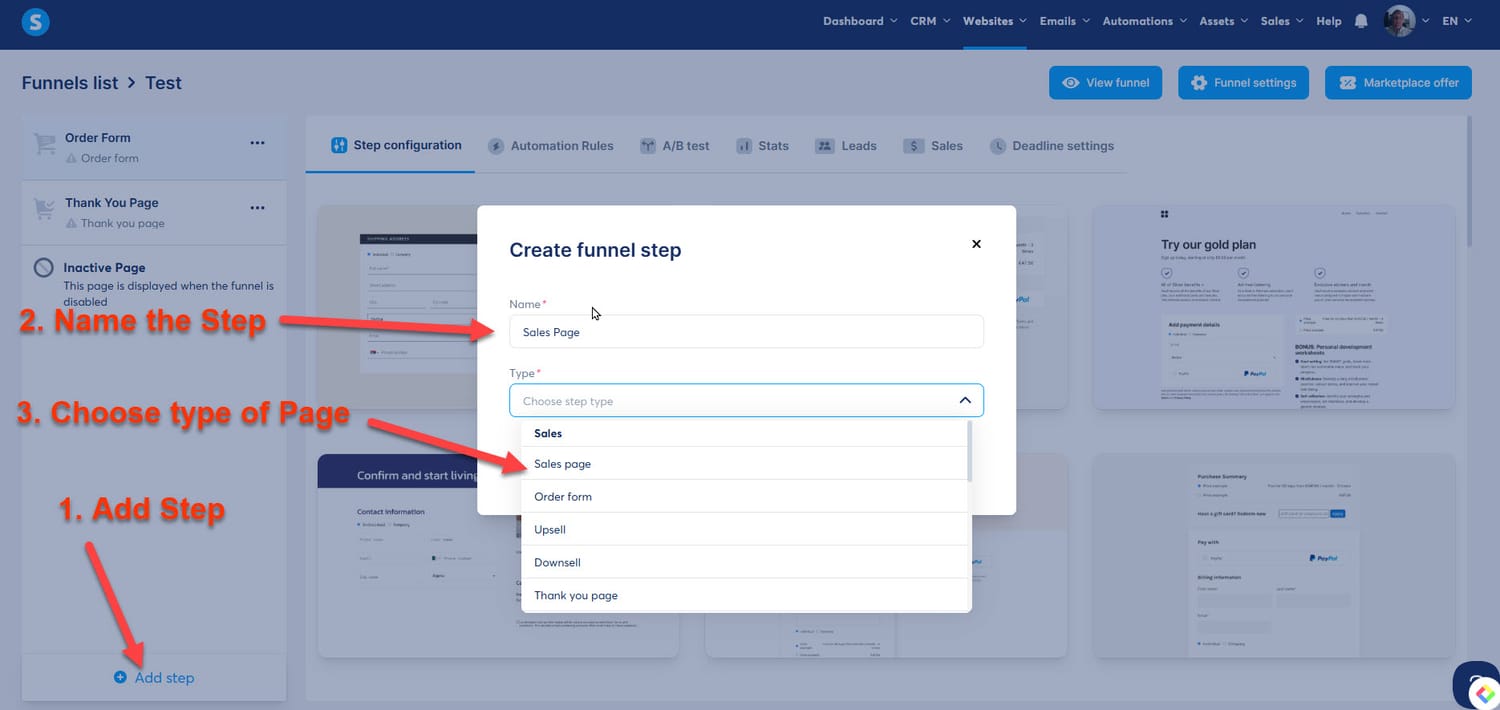
You can add, remove, or alter the steps in your funnel according to your marketing plan. This includes options like landing pages, sales pages, checkout pages, and thank-you pages.
Part 4: Creating Your Funnel Pages
4.1. Personalize Your Page Design with the Drag-and-Drop Tool
Select the funnel you wish to modify and click the “Edit Page” option.
In the editor, you can easily adjust your pages by dragging and dropping elements such as text, images, and forms to your desired locations.


4.2. Insert and Modify Page Components
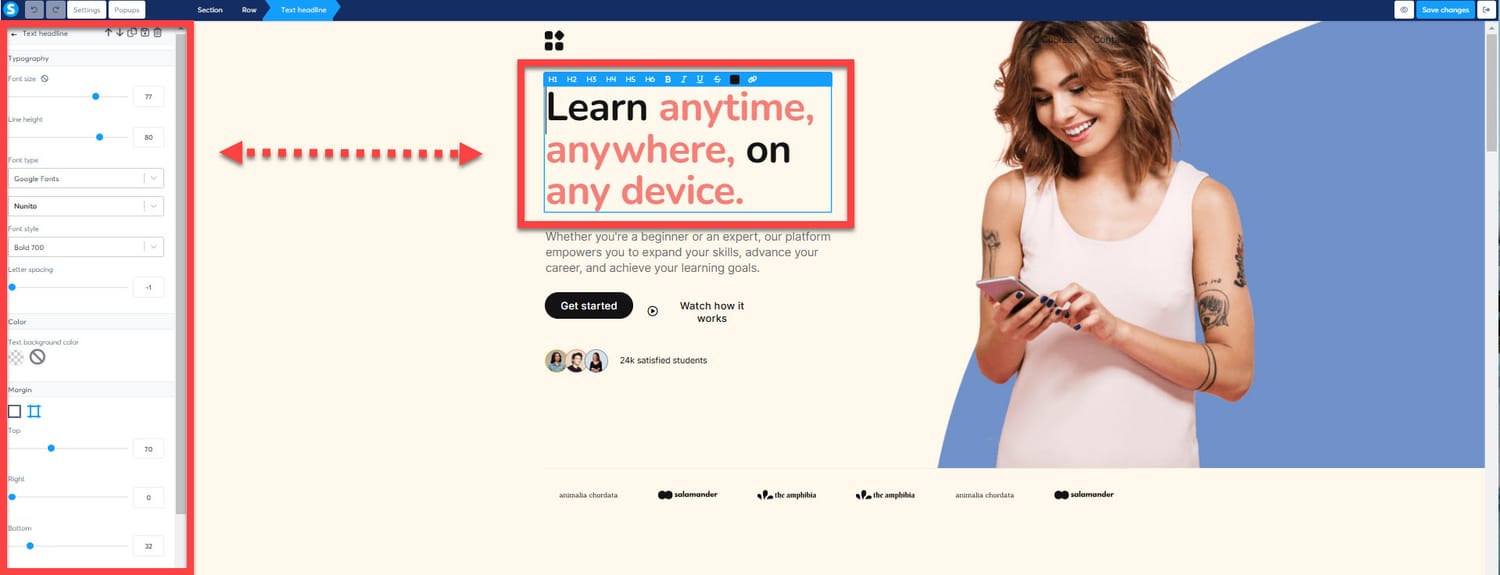
Add various components to your pages, including headlines, images, videos, buttons, and forms.
You can tailor each component by changing fonts, colors, sizes, and other settings to fit your design preferences.
4.3. Enhance Your Pages for SEO
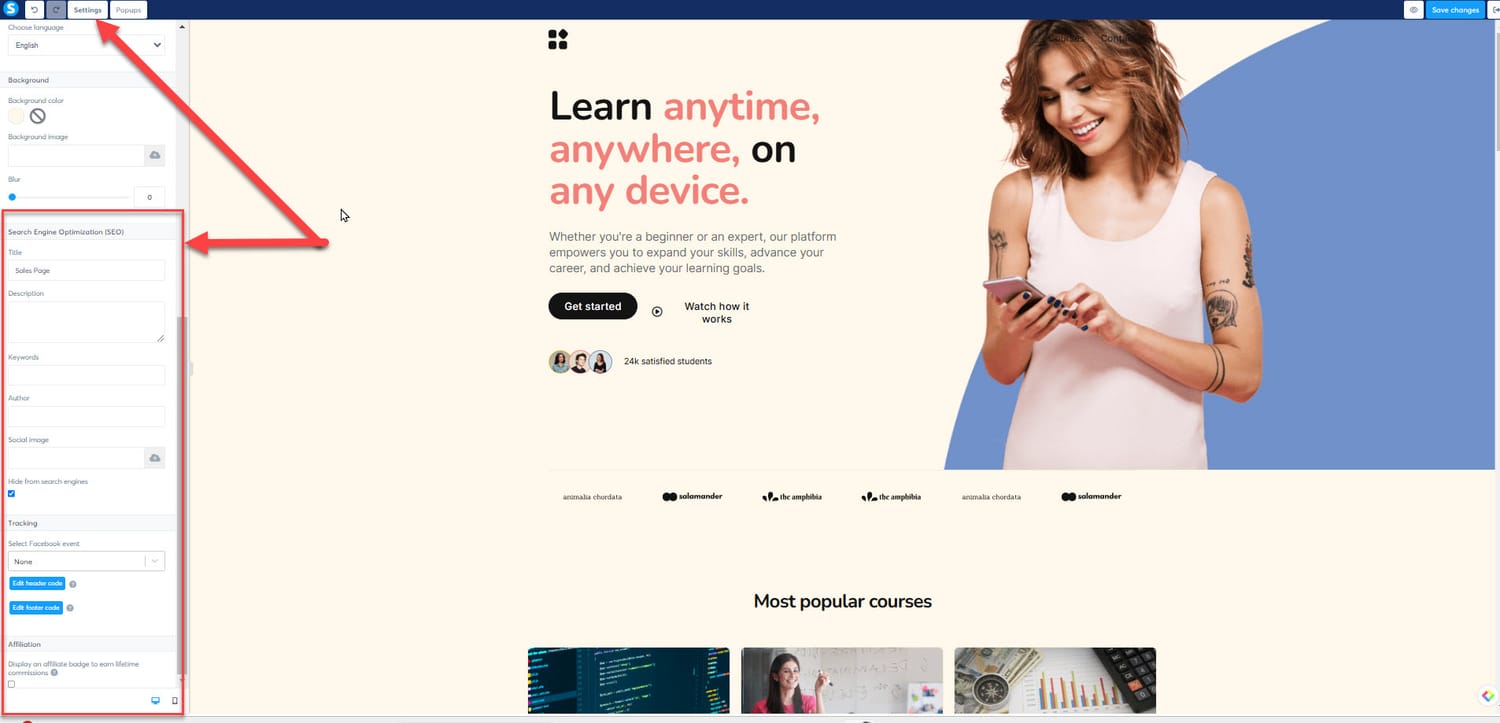
Boost your visibility in search engines by including meta titles, descriptions, and relevant keywords for each page.
Access the editor, then select “Settings” from the left panel. Scroll down to find the “Search Engine Optimization (SEO)” section.
4.4. Preview Your Pages and Set Them Live
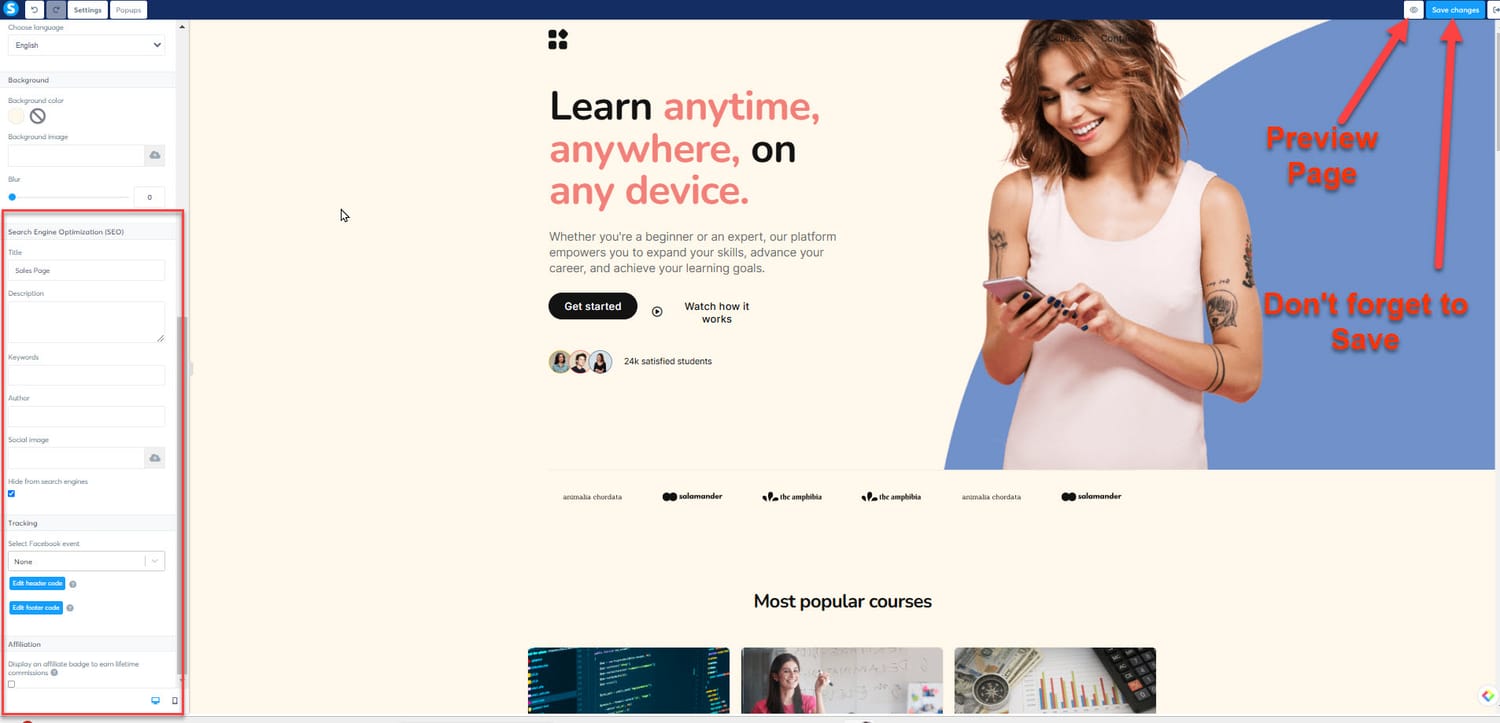
Click the “Preview” button to check how your pages look on various devices.
When you’re happy with the results, hit the “Publish” button to make your pages accessible to the public.
Part 5: Managing Your Contacts and Leads
5.1. Upload Your Current Contacts
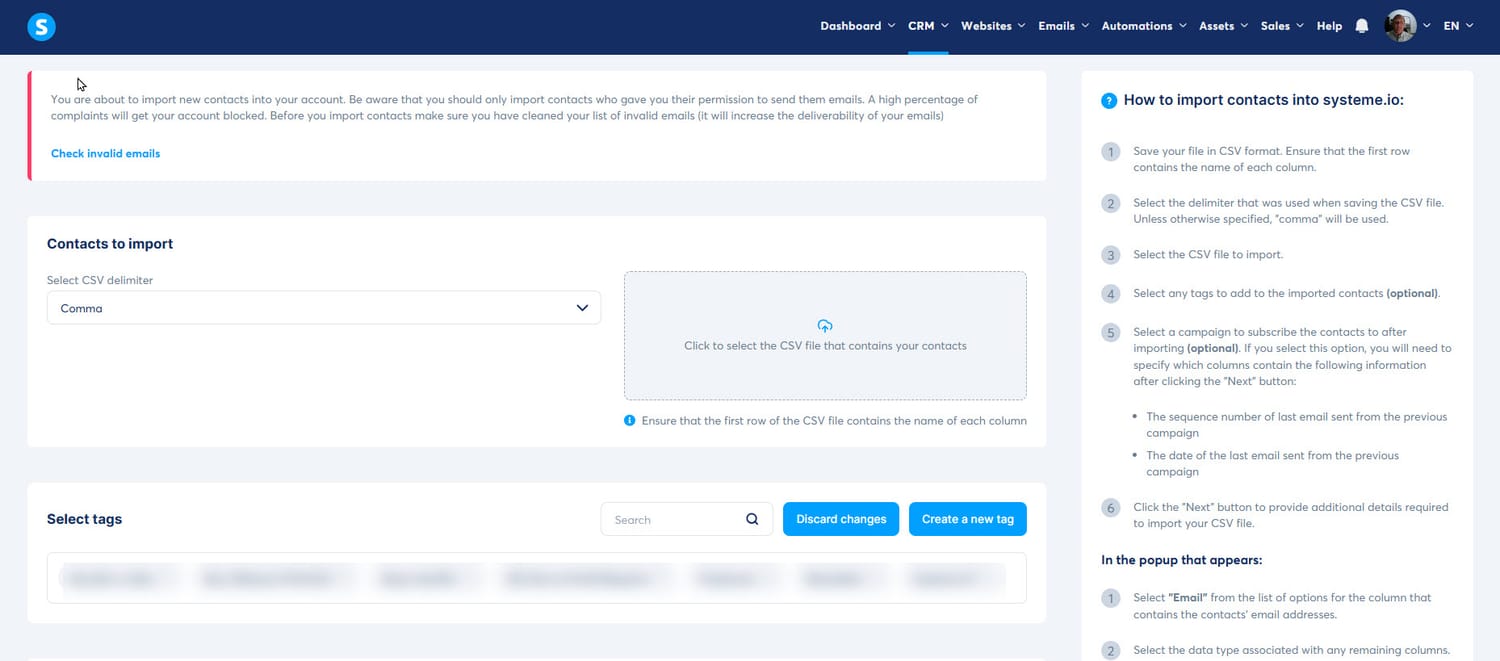
To effectively manage your marketing efforts, you can upload your current contact list toSysteme.io using a CSV file.
This process helps connect your existing contacts with your new funnel.

Here’s how to do it:
1. Prepare Your CSV File: Ensure your contact information is saved in a CSV file format.
The first row must include headers like “email,” “first_name,” and “last_name.” Subsequent rows should contain the related contact details.
2. Go to the Contacts Section: From your dashboard, select the "Contacts" tab located in the main menu.
3. Access the Import Feature: On the Contacts page, find and click the “Import contacts” button at the top right.
This will take you to the import section.
4. Choose Your CSV File: Click on “Choose file” to locate and select your CSV file on your computer, then click “Open.”
5. Select a Specific List (Optional): If you prefer adding these contacts to a particular list, use the dropdown menu labeled “Optional: if you want to add the contact to an existing email campaign.”
6. Map the Data Columns: After choosing your file, a preview will show your contact data.
Ensure that the columns in your CSV file match with the fields inSysteme.io, like matching “email” to the “Email” field. Modify mappings as needed.
7. Start the Import Process: Once everything is correct, click the “Import contacts” button at the bottom.
The system will begin the import.
8. Monitor Progress: Depending on how many contacts you’re importing, this process may take some time.
You can track the progress on the same page. A confirmation message will appear once the import finishes.
5.2. Organizing Contacts with Tags
You can enhance your marketing efforts by categorizing your contacts using tags.
Tags help you group your contacts by behavior, interests, or demographics, making it easier to run targeted campaigns.
Here’s how to create and manage tags:
1. Go to the Contacts Section: From the dashboard, click on the "Contacts" tab in the main menu.

2. Access the Tags Page: Find the “Tags” option in the submenu on the Contacts page and click on it to open the Tags management area.
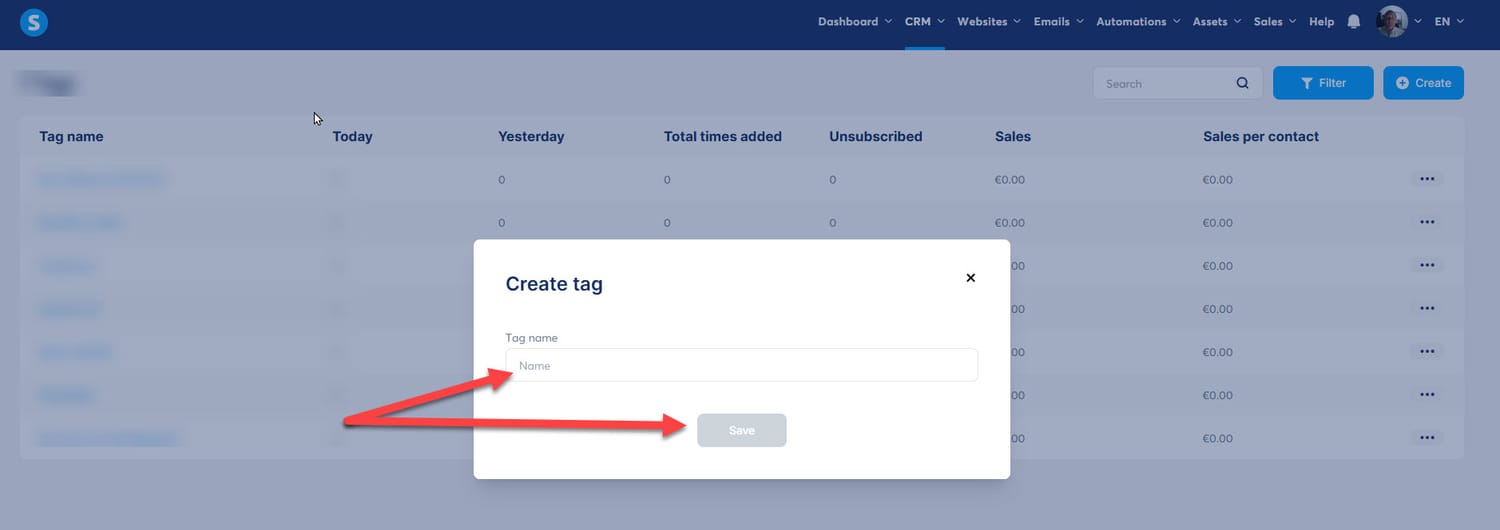
3.Create a New Tag: Click on the “Create” button in the upper right corner. A dialog box will open.

Name Your Tag: Type a descriptive title for your tag that will help you remember which contacts it represents. Hit “Save” to store your new tag.
Managing Tags
Assign Tags to Contacts: To tag a contact, go to the Contacts page and select the contact you wish to edit.
Click on the “More Actions” button, then select “Add tag.” A dialog box will pop up; choose the tag you want to apply and click “Save” to update the contact.
Remove Tags from Contacts: To take away a tag, repeat the steps for assigning a tag, but this time select the “Delete tag” option from the “More Actions” menu.
5.3. Establishing Automation Rules and Workflows for Lead Engagement
Setting up automation is vital for nurturing leads effectively.

You can create rules that trigger targeted actions based on how your contacts interact with your content, such as visiting a webpage or clicking on a link.

Here’s how to set automations:
1. Access the Automation Section: Click on the “Automations” tab in the main menu. Choose “Rules” to begin.
2. Create a New Automation Rule: Hit the “+ Create” button to start a new automation rule.
3. Define the Trigger: Click the “+” next to the trigger option and select one that fits your goals, like “Funnel step form subscribed,” “New sale,” or “Tag added.”
4. Set the Action: Click on the “+” next to the “Action” section to choose what you want to happen. Options include sending an email, subscribing to a campaign, or adding a tag.
Save the Automation Rule: Click “Save Rule” at the bottom left when you’re satisfied with your setup.
Creating Workflows
1. Navigate to Workflows: In the “Automations” section, click on “Workflows.”
2. Set Up a New Workflow: Click the “Create” button, enter a name for your workflow, and save it.
3. Add a Trigger: Click “Create your first trigger” and select one based on your needs (e.g., “Funnel form subscribed,” “New sale,” or “Tag added”).
Insert Steps: After choosing a trigger, click on “+” to add steps like:
An action: Perform actions like “Add a tag” or “Subscribe to a campaign.”
A decision: Set up splits in the workflow based on contact criteria using the filters available.
A delay: Introduce a wait time before the workflow proceeds to the next action.
4. Configure Each Step: Depending on the type of step you choose, follow the settings specifics. For example, if you opted for “Subscribe to a campaign,” select the relevant campaign from the list.
Save and Activate the Workflow: Once you finish adding and configuring all steps, save your workflow.
To make it live, go back to the workflows list and click “Activate” next to your workflow.
Part 6: AdditionalSysteme.io Features
6.1. Build and Sell Online Courses
WithSysteme.io, you can easily create, host, and market online courses to your audience.
1. Initiate a New Course:
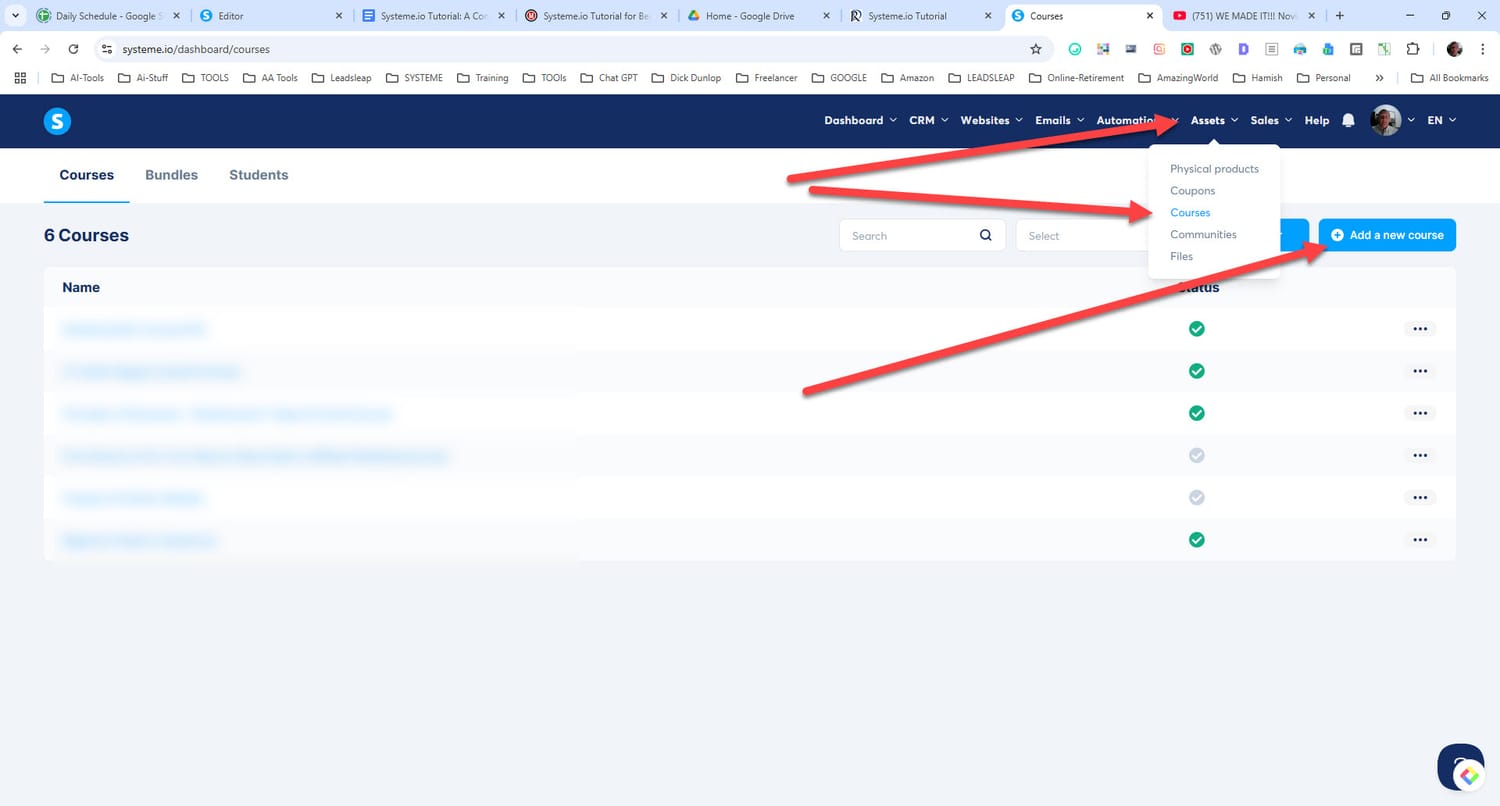
Start by navigating to the “Products” section in the main menu.
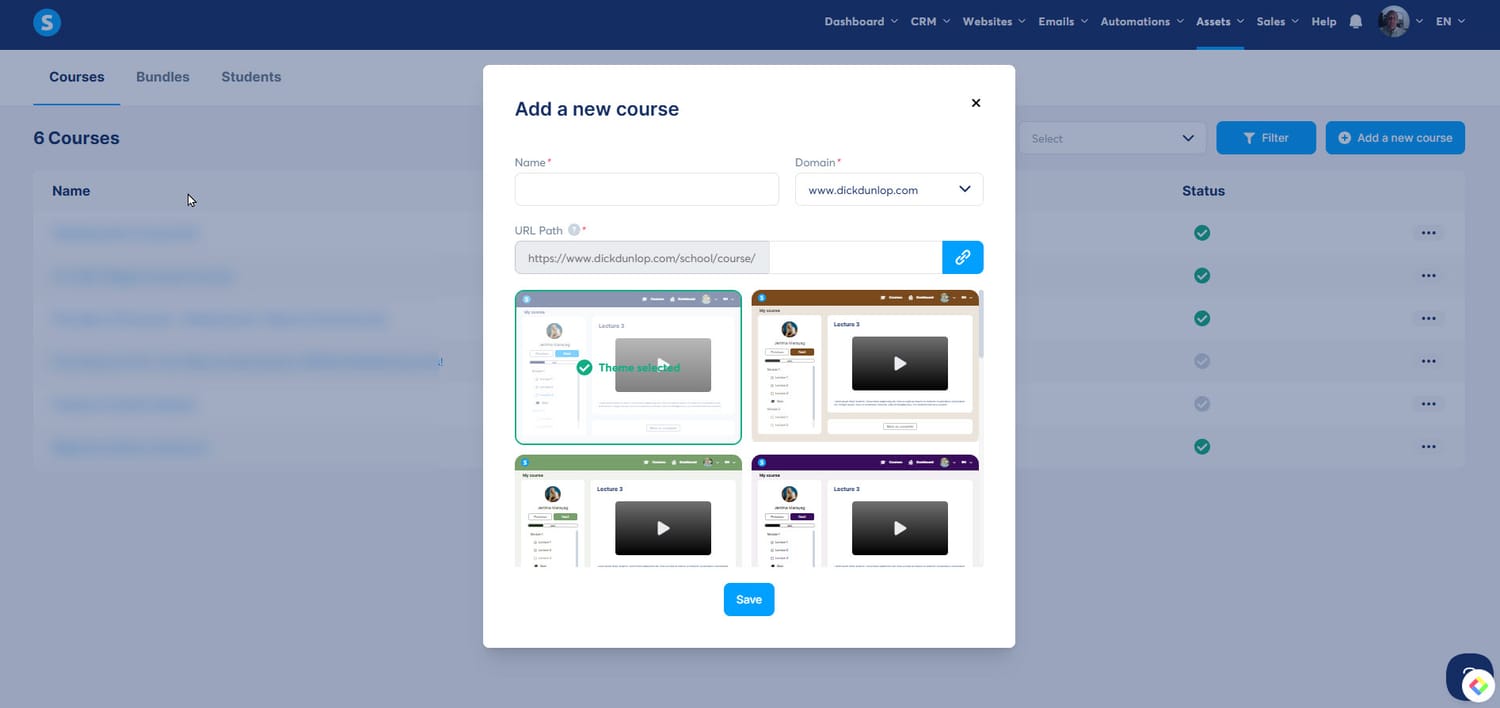
Click on “Courses,” then select the “Add a new course” option.
Enter the necessary details, like the course name, description, images, and other relevant information.
Don’t forget to click “Save” to keep your settings.
2. Add Course Modules:
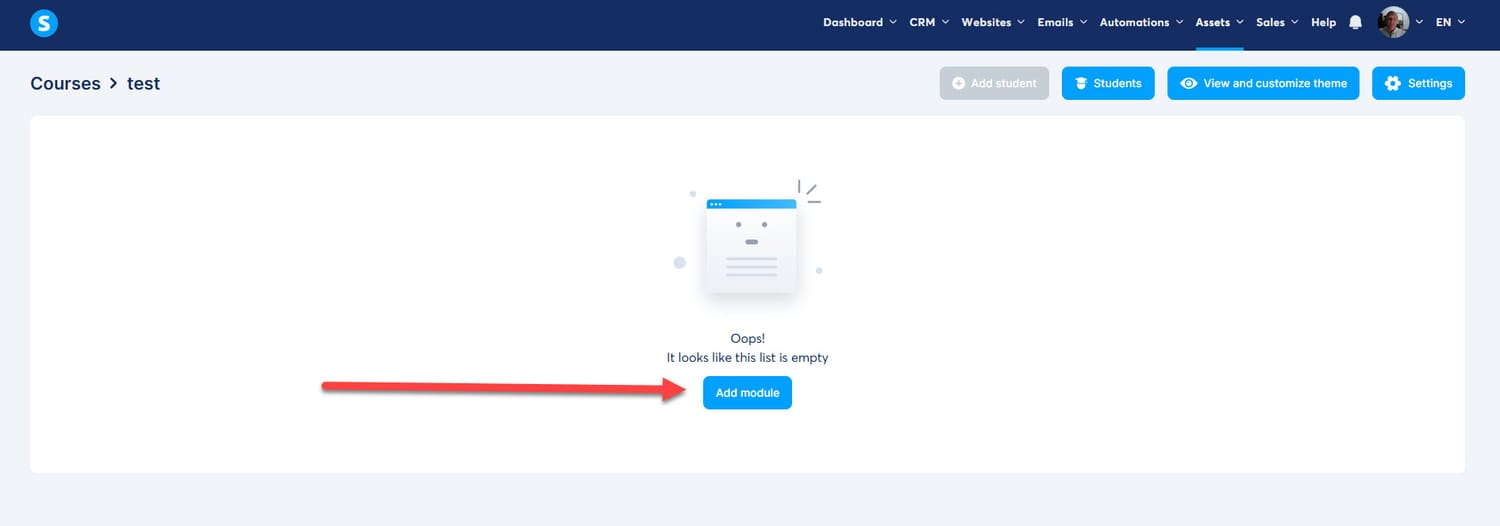
Once your course is set up, click on the “Add module” button. Here, you can input the module name and confirm by clicking “Save.”
3. Develop Lectures:
To add lectures within your module, click on the “Add lecture” button.
Fill in the required details such as the lecture title and any delays for the following lectures. You can also pick a template and tailor it using the course editor.
Remember to click “Save” to finalize your first lecture. For more lectures, either repeat these steps or duplicate an existing one.
For more lectures, either repeat these steps or duplicate an existing one.
4. Set Up a Sales Funnel: To successfully sell your course, you will need a sales funnel.
Go to the “Funnels” tab on the main menu. Click on “Create a funnel,” select the “Sell a product” template, and hit “Create.”
5. Configure the Order Form: Within your funnel, click on the “Order form.”
Choose “Digital product” as your offer type. In the “Resources” section, click the “+” icon, select “Course” for the resource type, and choose your course. You can also define access types, such as Full access or Drip content. Be sure to set any specific access days or expiration dates as needed.
6. Optional Customer Tags: If you wish to segment your customers for targeted marketing, you can add tags.
Click on the “+” icon in the resources section, choose “Tag,” and select the tag you want. Always remember to save your adjustments.
7. Save and Publish: After configuring your order form and optional customer tags, click “Save” to store your changes. To make your funnel live, click the “Publish” button in the upper right corner.
Promote Your Course: Share the URL of your sales funnel with your audience through email campaigns or social media to drive sales.
6.2. Create an Affiliate Program
Setting up an affiliate program withSysteme.io is a great way to have others promote your products or services. You can customize commission rates and monitor performance effectively.
Here’s how to set it up.
1. Create a New Funnel: Start by establishing a new funnel in yourSysteme.ioaccount. Follow the provided instructions for creating a funnel.
2. Design an Order Form Page: Set up an order form page as part of your funnel. You can find detailed guides on how to accomplish this. (see above)
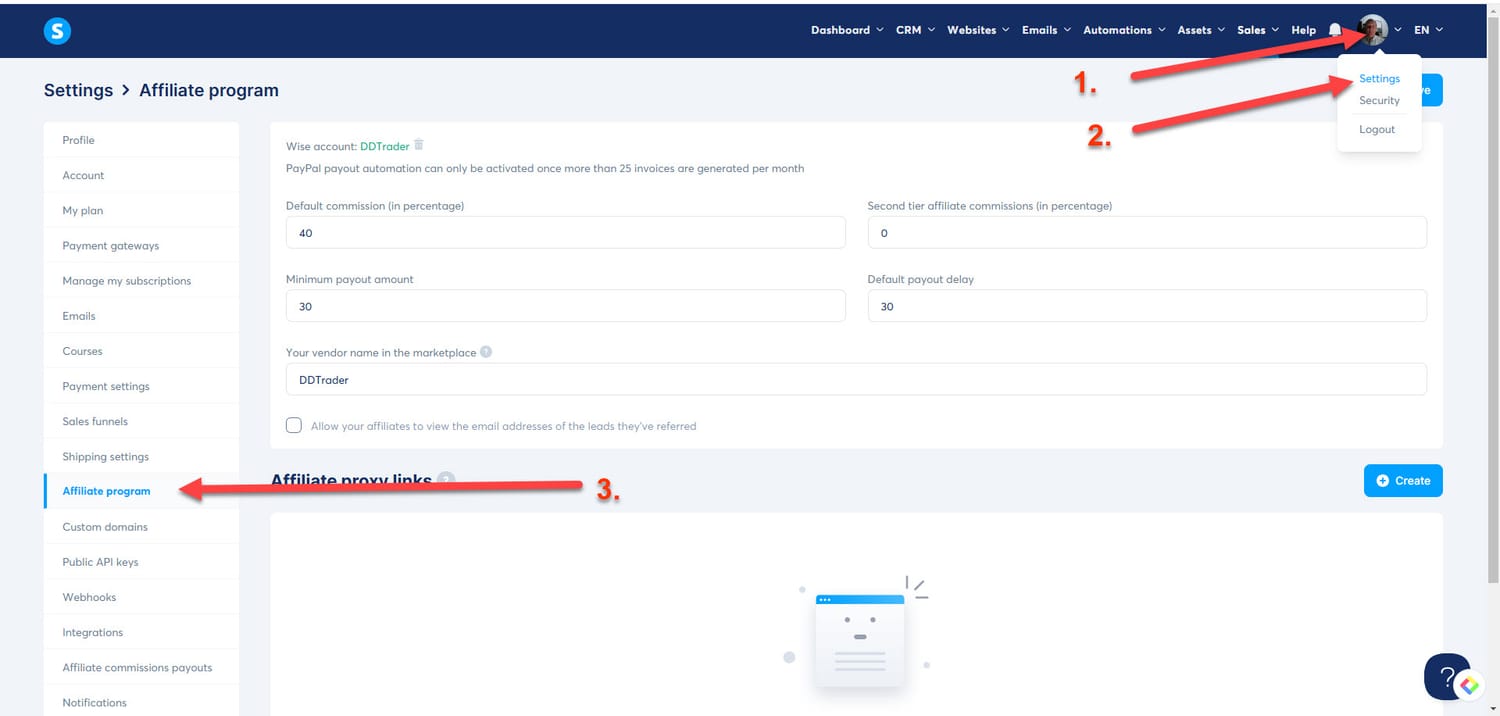
3.Adjust Affiliate Program Settings: In yourSysteme.io account, go to:
Menu >> Settings >> Affiliate program settings. Fill out these fields:
Default commission (%): Set your desired affiliate commission percentage.
Minimum payout amount: Define the minimum earnings required for an affiliate to get paid.
Default payout delay: Establish how many days must pass before affiliates receive their payment.
Second-tier affiliate commissions (%): Enter the commission percentage for second-tier affiliates, should you want to offer this.
Refine Settings for Your Order Form Page:
Navigate to the “Order form” within your funnel and click on “Settings.” Here, you can modify:
Affiliate commission amounts on the sales page.
Payment periods for affiliate commissions.
After making your changes, save everything by clicking the green floppy disk icon.
Setting a 0% Commission: If you wish to exclude commissions for particular sales funnels, simply set the affiliate commission to “0%” on that specific payment page.
With these steps, you can effectively leverage an affiliate program to boost your product’s visibility and sales through others.
Final Thoughts
You've learned the fundamentals of usingSysteme.io for your online business, from establishing your account to navigating the dashboard.
The platform allows you to easily create sales funnels, generate email lists, and sell your courses or products.
Additionally, it offers options for affiliate marketing and advanced features that enhance your business operations.
Systeme.io is designed for ease of use, helping you operate efficiently and effectively.
Take the opportunity to explore this powerful tool and unlock its full potential to elevate your business.
Helpful Resources
For more assistance and guidance withSysteme.io, consider the following options:
Systeme.io Help Center:
Access the official support site atSysteme.io Help Center.
Here, you will find detailed documentation, tutorials, and FAQs that address common issues.
Video Tutorials: Discover a collection of educational videos onSysteme.io Video Tutorials. These videos cover various features and tools, helping you enhance your understanding of the platform.
Contact Support: If you encounter problems, you can reach out viaSysteme.io Support. The support team is available to assist you with any challenges you might face.
YouTube Channel: Check out the officialYouTube Channel for a range of videos that further explain how to maximizeSysteme.io's capabilities.
Facebook Group: Join theSysteme.io Creators’ Group on Facebook to connect with fellow users. This community offers opportunities to seek advice and share experiences with both users and experts.
Feel free to utilize these resources to ensure you are getting the most out of your experience withSysteme.io.
Frequently Asked Questions
How can a beginner efficiently start usingSysteme.io?
To get started withSysteme.io, you can explore the officialtutorial videos that explain the platform's main features. Additionally, consider signing up for a free account to access hands-on experience while following along with the training materials. Engaging with community forums can also provide valuable insights and tips from other users.
Where can I find a complete PDF guide forSysteme.io?
For a detailed PDF guide aboutSysteme.io, you can check the help center on their official website. The help center often houses a variety of resources, including downloadable content that covers features, best practices, and step-by-step instructions.
What training options are available forSysteme.io users?
Systeme.io offers several training resources such as video tutorials, live webinars, and a help center filled with articles.
You can start with the officialfree training to get a solid grasp of the platform. Consider joining community groups where you can access shared knowledge and ask questions.
How can you create and sell an online course usingSysteme.io?
To create and sell an online course onSysteme.io, first, navigate to the course creation section. There, you can set up modules, lessons, and content formats. You can also customize the sales funnel to promote your course effectively. Once it's ready, set pricing and use email marketing tools to reach your audience.
What templates doesSysteme.io provide to simplify the setup process?
Systeme.io offers a variety of templates for different purposes, including sales funnels, landing pages, and email campaigns. These ready-made templates help you streamline your setup, allowing you to focus on content rather than layout. You can easily customize any template to fit your brand and needs.
What are the steps to integrateSysteme.io's API with other software?
IntegratingSysteme.io's API with other applications involves a few steps. First, you need to obtain your API key from the settings menu. Next, follow the API documentation to implement the necessary endpoints in your preferred software. Ensure you test the integration thoroughly to confirm that data flows correctly between systems.
This is an independent website unrelated to Systeme.io.
The author alone bears sole responsibility for the views and materials stated here.
Any reference to third-party goods, services, or trademarks serves only for informative purposes; it does not indicate any kind of association or endorsement.
Some links are Affiliate Links and some links are for information only.
© theancientmarketer.com - All rights reserved


